How to Convert Personal Computer to Television in 12 steps
Friday, May 04, 2007 Posted by Aman Jain

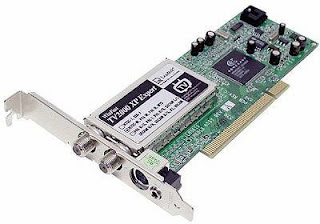
If you have a decently configured PC with good speakers and a DVD drive ,converting it to serve as a media Entertainment center is a simple matter of installing a good TV tuner card and the appropriate software .All you need to do is plug in the TV Tuner card,install the drivers and software ,connect the cable to the card and scan for channels .
Step 1. As this project requires setting up both hardware and software the first step consists opening the cabinet,finding the suitable free PCI slot and inserting a TV Tuner card.Once the card is attached ,start the computer.
Step 2. As soon as you start the computer the OS will display a message saying “Multimedia Controller Found”.If you view the device manager at this moment ,you will find a number of devices marked with question marks or exclamations .You will be asked to insert the driver CD to continue installing the drivers-Insert the CD provided by the manager and click Next.
Step 3. Windows will try to search for the drivers from the CD-ROM drive and then display all suitable ones .If the list shows more than one drivers then choose the right
one according to the OS installed .Select the driver and Press Next .When you press Next the driver installation process begins. Once its done ,press Finish to finish the installation.
Step 4.If you check the device manager you’ll see that due to the add on drivers that are needed the list of devices with question marks and exclamation has increased .Windows should remedy this automatically,but if it asks for the driver CD ,repeat the previous step.
Once the Process is completed all the unknown devices will have vanished ,and the list in ‘Sound ,Video and Game controllers’ will display the new set of hardware installed.
Step 5. Now we go back to the hardware level ,to do the wiring properly.To capture the video signals connect the TV cable to the Tuner Card.
To get a video signal via composite ,connect the audio out of the Video Player to the audio in the jack and connect the composite out jack of the player to the composite in of the Tuner Card.
If your card does not have an Audio in ,you need to connect the audio out of the video player to the line in of the sound card,.if it has Audio in connect the Audio Out of the player to it ;Connect the composite out of the video player to the composite in of the tuner.Now using a small male-male stereo cable connect the audio out of the tuner card to the Mic in of the sound card.

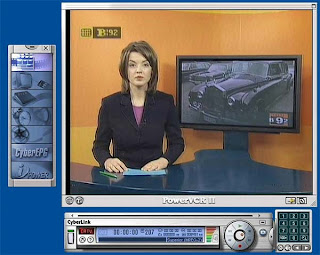
Step 6. Now that you have installed the hardware and drivers ,you are ready to install the capture software- for eg PowerVCR.When installing PowerVCR you are asked to specify a program directory and a working directory where all the recorded video will be stored .You are also asked whether you want to back up your system files or just install the software-choose to back up the system files as this will help you to revert to your systems previous state if you want to uninstall the software .All the necessary codecs are also installed.Restart the machine once you are done with installing.
Step 7. The very first thing that you have to do is to configure the channels.As soon you start the software ,you are asked to do this .this can be done by pressing the Auto Scan option and let the software set the channel automatically.You can spend a little time in naming the channels but remember these names are stored in the software .So if your cable operator changes the frequencies of the channels you are going to have wrongly named channels.
Step 8 .Now you need to configure some of the other parameters depending on your needs.Click on the button with the nail and hammer image-you will see a list of Tabs ,each showing a lot of parameters to be configured.
The first Tab is V/A devices ,where you can set the proper Video/Audio parameters such as video capture device ,audio capture device ,video source ,audio source etc.In this case the video and audio capture devices are the TV Tuner card itself.
If your TV Tuner does not have audio in remember that the audio capture device has to be set as you sound card.
You also need to specify the signal source as TV,S-Video,or composite.This will be TV mostly and when you want to connect a video player change it to Composite or S-Video.You also need to set the audio Input to Mic In.
Step 9. In the video Tab ,set the actual video adjustment options such as brightness ,hue ,contrast ,sharpness and saturation.
Step 10. The software supports profiles for capture formats,so this step involves selecting the obvious one in the profiles Tab .You have a wide variety to choose from –PAL,NTSC,MPEG- 1,MPEG-2 etc
Step 11. The next Tab deals with configuring the default options that you need for recording say the time ,and some advanced options such as Noise removal,Video smoothing etc.
Step 12. In the Snapshot Tab specify which folder to save the snapshot images you take .The Last Step TV replay,lets you configure the Replay Buffer Time Limit that decides how much the software caches to show you when you demand an instant reply.
Draw the curtains ,hang the no disturb sign on the door and tune into your favorite show!!
Step 1. As this project requires setting up both hardware and software the first step consists opening the cabinet,finding the suitable free PCI slot and inserting a TV Tuner card.Once the card is attached ,start the computer.
Step 2. As soon as you start the computer the OS will display a message saying “Multimedia Controller Found”.If you view the device manager at this moment ,you will find a number of devices marked with question marks or exclamations .You will be asked to insert the driver CD to continue installing the drivers-Insert the CD provided by the manager and click Next.
Step 3. Windows will try to search for the drivers from the CD-ROM drive and then display all suitable ones .If the list shows more than one drivers then choose the right
one according to the OS installed .Select the driver and Press Next .When you press Next the driver installation process begins. Once its done ,press Finish to finish the installation.
Step 4.If you check the device manager you’ll see that due to the add on drivers that are needed the list of devices with question marks and exclamation has increased .Windows should remedy this automatically,but if it asks for the driver CD ,repeat the previous step.
Once the Process is completed all the unknown devices will have vanished ,and the list in ‘Sound ,Video and Game controllers’ will display the new set of hardware installed.
Step 5. Now we go back to the hardware level ,to do the wiring properly.To capture the video signals connect the TV cable to the Tuner Card.
To get a video signal via composite ,connect the audio out of the Video Player to the audio in the jack and connect the composite out jack of the player to the composite in of the Tuner Card.
If your card does not have an Audio in ,you need to connect the audio out of the video player to the line in of the sound card,.if it has Audio in connect the Audio Out of the player to it ;Connect the composite out of the video player to the composite in of the tuner.Now using a small male-male stereo cable connect the audio out of the tuner card to the Mic in of the sound card.

Step 6. Now that you have installed the hardware and drivers ,you are ready to install the capture software- for eg PowerVCR.When installing PowerVCR you are asked to specify a program directory and a working directory where all the recorded video will be stored .You are also asked whether you want to back up your system files or just install the software-choose to back up the system files as this will help you to revert to your systems previous state if you want to uninstall the software .All the necessary codecs are also installed.Restart the machine once you are done with installing.
Step 7. The very first thing that you have to do is to configure the channels.As soon you start the software ,you are asked to do this .this can be done by pressing the Auto Scan option and let the software set the channel automatically.You can spend a little time in naming the channels but remember these names are stored in the software .So if your cable operator changes the frequencies of the channels you are going to have wrongly named channels.
Step 8 .Now you need to configure some of the other parameters depending on your needs.Click on the button with the nail and hammer image-you will see a list of Tabs ,each showing a lot of parameters to be configured.
The first Tab is V/A devices ,where you can set the proper Video/Audio parameters such as video capture device ,audio capture device ,video source ,audio source etc.In this case the video and audio capture devices are the TV Tuner card itself.
If your TV Tuner does not have audio in remember that the audio capture device has to be set as you sound card.
You also need to specify the signal source as TV,S-Video,or composite.This will be TV mostly and when you want to connect a video player change it to Composite or S-Video.You also need to set the audio Input to Mic In.

Step 9. In the video Tab ,set the actual video adjustment options such as brightness ,hue ,contrast ,sharpness and saturation.
Step 10. The software supports profiles for capture formats,so this step involves selecting the obvious one in the profiles Tab .You have a wide variety to choose from –PAL,NTSC,MPEG- 1,MPEG-2 etc
Step 11. The next Tab deals with configuring the default options that you need for recording say the time ,and some advanced options such as Noise removal,Video smoothing etc.
Step 12. In the Snapshot Tab specify which folder to save the snapshot images you take .The Last Step TV replay,lets you configure the Replay Buffer Time Limit that decides how much the software caches to show you when you demand an instant reply.
Draw the curtains ,hang the no disturb sign on the door and tune into your favorite show!!


0 comments:
Post a Comment